Terraform은 클라우드 인프라를 자동화하기 위한 솔루션이다.
테라폼을 정리하기 전에 IaC(Infrastructure as Code)에 대해 살펴보자.
코드형 인프라(Infrastructure as Code, IaC)
코드형 인프라는 말 그대로 인프라를 코드형으로 관리하는 것이다.
그럼 왜 인프라를 코드로 관리하는지 그 이유를 알아보자.
이유는 크게 아래 두 가지이다.
1. 코드 작성을 통해 버전 관리와 자동화를 수행하여 사용자 에러, 인프라 빌드 실패를 방지할 수 있다.
2. 작성된 코드를 재사용하여 생산성 증대가 가능하다.
결국 인프라 환경을 사람이 버튼을 하나하나 클릭해가며 구성하는 것은 에러가 발생할 수 있고,
일관된 인프라 구성이 힘들고, 2개를 만드려면 똑같은 작업을 2번 수행해야 한다는 뜻이다.
반면, 소스 코드는 한번 작성해두면 변하지 않는다.(리전, 설정값 등은 변경될 수 있다.)
그러므로 IaC 형태로 구현하면 시간도 절약되고 오류도 없고 여러 장점이 있다.
AWS 인프라를 코드로 관리한다고 하면 아마 아래와 같은 느낌일 것이다.
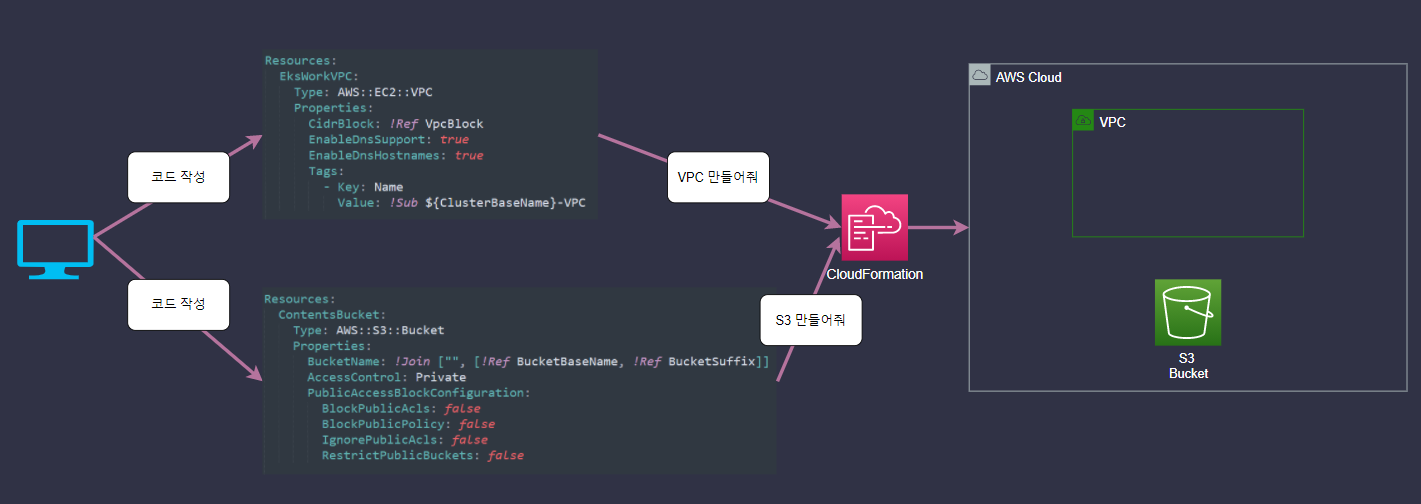
위 작업을 AWS 웹 콘솔에서 진행하려면
1. VPC 서비스에 들어가서 새 VPC를 생성하고 Subnet, Routing Table 등등을 만들고
2. S3 서비스에 들어가서 새 버킷을 생성하고 권한을 일일이 편집해줘야 한다.
지금까진 IaC를 위해 CloudFormation을 사용했으니, 이번 포스팅에선 IaC 솔루션 중 하나인 Terraform을 배워보자.
CloudFormation, Terraform, Ansible과 같은 솔루션은 모두 IaC를 위해 사용되지만 그 특징은 조금씩 다르다.
다음 포스팅에선 이 차이점을 파악해보자.
Terraform
테라폼은 HashiCorp에서 제공하는 클라우드 인프라 환경 배포 툴이다.
Terraform에서는 HCL(HashiCorp Configuration Language)을 통해 인프라와 프로바이더가 제공하는
서비스를 코드 기반으로 생성하고, 운영하는 프로세스를 자동화 하는 기술을 제공한다.
여기서 프로바이더(Provider)는 외부 서비스를 연결해주는 기능을 하는 '모듈'이라고 생각하면 된다.
그럼 HCL은 무엇일까?
HCL은 테라폼에서 사용하는 설정 언어이다.
모든 설정과 리소스 선언은 이 HCL을 사용해 이루어지며, 확장자 .tf를 사용한다.
HCL의 예시는 아래와 같다.
provider "aws" {
  access_key = "<AWS_ACCESS_KEY>"
  secret_key = "<AWS_SECRET_KEY>"
  region = "us-west-2"
}
실습을 진행하기 전에 Terraform의 Plan & Apply 배포 프로세스를 알아보자.
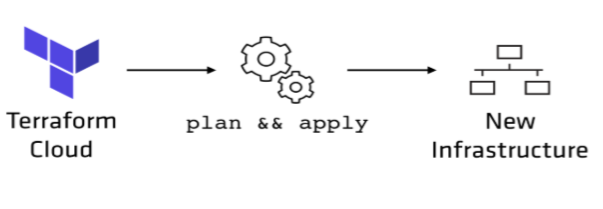
Terraform은 Plan 단계에서 자동적으로 의존성을 검사하여, 자원 생성의 전후 관계를 미리 알 수 있는 사전 리뷰 기능을 제공한다.
Apply는 실질적인 배포 및 변경 작업을 수행한다.
장점으로 Cost Estimation, SAML SSO 인증, Resource Graph 등 여러 가지가 있으며,
실습을 진행하면서 천천히 확인해보도록 하자.
작업 환경 세팅
실습을 위해 먼저 작업 환경을 세팅한다.
이번 포스팅에선 Cloud9을 활용하며 Cloud9 세팅에 대한 내용은 생략하도록 한다.(앞선 포스팅에 多)
-> 리전은 오레곤이며 Default VPC, us-west-2a로 구성하였다.
[AWS managed temporary credentials] 체크를 해제하여 비활성화 시켜준다.
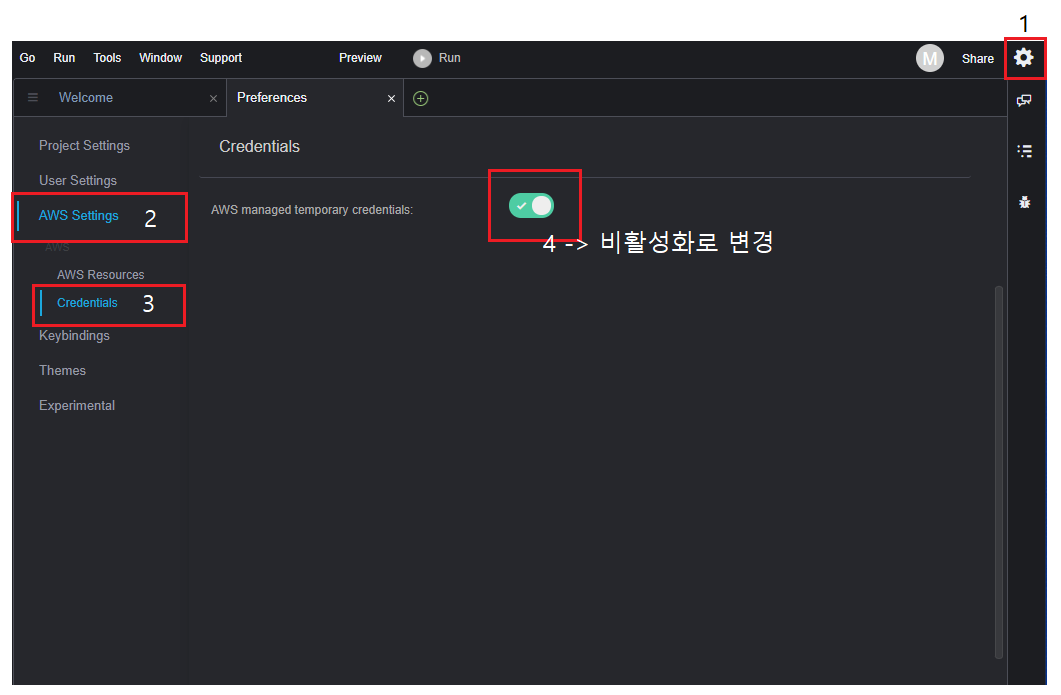
credentials를 비활성화 했기 때문에 현재 aws 계정에 대한 접속 권한이 없는 상태이다.
mzmz01:~/.aws $ pwd
/home/ec2-user/.aws

mzmz01:~/.aws $ ls -al
total 4
drwxr-xr-x  2 ec2-user ec2-user    6 Sep 18 08:11 .
drwx------ 12 ec2-user ec2-user 4096 Sep 18 08:11 ..
aws configure 명령을 통해 credentials를 생성하자.
mzmz01:~/.aws $ aws configure
AWS Access Key ID [None]: [액세스 키 ID]
AWS Secret Access Key [None]: [비밀 액세스 키]
Default region name [None]: us-west-2
Default output format [None]: json
설정 후에는 아래와 같이 credentials 파일이 생성된 것을 확인할 수 있다.
mzmz01:~/.aws $ ls -al
total 12
drwxr-xr-x  2 ec2-user ec2-user   39 Sep 18 08:14 .
drwx------ 12 ec2-user ec2-user 4096 Sep 18 08:11 ..
-rw-------  1 ec2-user ec2-user   43 Sep 18 08:14 config
-rw-------  1 ec2-user ec2-user  137 Sep 18 08:14 credentials
이제 Terrform을 설치해보자.
먼저 yum-config-manager를 통해 repository를 추가해준다.
(already installed and latest version이라고 표시되면 그냥 다음 단계로 넘어가면 된다.
아마 cloud9에는 기본적으로 설치가 돼있는 것 같다.)
mzmz01:~/.aws $ sudo yum install -y yum-utilsmzmz01:~/.aws $ release=AmazonLinux
mzmz01:~/.aws $ sudo yum-config-manager --add-repo https://rpm.releases.hashicorp.com/$release/hashicorp.repo
terraform 패키지를 설치한 후 테라폼 버전을 확인한다.
mzmz01:~/.aws $ sudo yum install terraformmzmz01:~/.aws $ terraform -version
Terraform v1.0.7
on linux_amd64
Terraform 파일과 명령어
이제 실습 환경 구축이 끝났다.
Terraform은 *.tf 확장자를 가지며 일반적인 구성은 아래와 같다.
main.tf : 생성하고자 하는 리소스 정의
variables.tf : 자주 사용하는 변수 값을 정의
outpus.tf : terraform 실행 끝에 표시되는 내용 정의
Terraform의 명령어에서 자주 쓰이는 것들을 아래와 같다.
terraform init
#Terraform을 사용하기 위해, 설정한 provider나 module 등을 다운로드 받는
initialize 동작을 수행한다.

terraform plan
#코드로 작성한 infrastructure를 실제 적용하기 전에 변경사항을 미리 체크할 수 있다.

terraform apply
#코드로 작성한 infrastructure를 실제로 적용시키는 명령어이다.

terraform destroy
#Terraform으로 생성된 infrastructure 리소스들을 모두 삭제시키는 명령어이다.
Terraform 코드
테라폼은 무엇이든 빌드하려면 하나 이상의 공급자가 필요하다.
variables.tf 파일을 생성하여 provider 구문을 입력해보자.
mzmz01:~/environment/prac $ cat variables.tf
provider "aws" {
  region = var.region
  shared_credentials_file = "~/.aws/credentials"
  profile = "default"
}
terraform init 명령어를 입력하면 현재 설정된 provider인 'aws'에 맞는 플러그인을 설치한다.
mzmz01:~/environment/prac $ terraform init

Initializing the backend...

...
...

Terraform has been successfully initialized!
mzmz01:~/environment/prac $ ls -al
total 8
drwxrwxr-x 3 ec2-user ec2-user 71 Sep 18 09:10 .
drwxr-xr-x 4 ec2-user ec2-user 46 Sep 18 09:10 ..
drwxr-xr-x 3 ec2-user ec2-user 23 Sep 18 09:10 .terraform
-rw-r--r-- 1 ec2-user ec2-user 1077 Sep 18 09:10 .terraform.lock.hcl
-rw-rw-r-- 1 ec2-user ec2-user 112 Sep 18 09:10 variables.tf
mzmz01:~/environment/prac $ cat .terraform.lock.hcl
# This file is maintained automatically by "terraform init".
# Manual edits may be lost in future updates.
provider "registry.terraform.io/hashicorp/aws" {
version = "3.59.0"
hashes = [
..
..
]
자주 사용하는 변수 값은 variable 구문을 통해 미리 정의할 수 있다.
조금 전 생성했던 variables.tf 파일에 다음과 같이 입력해보자.
mzmz01:~/environment/prac $ cat variables.tf
provider "aws" {
  region = var.region
  shared_credentials_file = "~/.aws/credentials"
  profile = "default"
}

variable "region" {
  description = "리전을 선택합니다. e.g: us-west-2"
  type = string
  default = "us-west-2"
}

variable "tags" {
  type = object({ MadeBy = string })

  default = {
    MadeBy = "ljj"
  }
}

variable "az_names" {
  description = "Availability Zones"
  type = list(string)
  default = [
    "us-west-2a"
  ]
}

variable "public_subnets" {
  description = "퍼블릭 서브넷 목록을 입력합니다."
  type = list(object({
    zone = string
    cidr = string
  }))

 default = [
    {
      zone = "us-west-2a"
      cidr = "10.0.1.0/24"
    }
  ]
}
기존 구성되어 있는 인프라 정보는 data 구문을 사용하여 참조할 수 있다.
main.tf 파일을 생성하고 아래와 같이 입력해주자.
mzmz01:~/environment/prac $ cat main.tf
#account_id
data "aws_caller_identity" "current" {}

#iam_user
data "aws_iam_user" "prd-put-s3-data" {
    user_name = "prd-put-s3-data"
}

resource "aws_iam_policy_attachment" "s3-push-web-all" {
  name = "s3-push-web-all"
  users = [data.aws_iam_user.prd-put-s3-data.user_name]
  roles = [aws_iam_role.s3-push-web-all.name]
  policy_arn = aws_iam_policy.s3-push-web-all.arn
}
이제 본격적인 인프라 리소스를 생성하기 위해 resource 구문을 사용해보자.
mzmz01:~/environment/prac $ cat main.tf
#account_id
data "aws_caller_identity" "current" {}

#iam_user
data "aws_iam_user" "prd-put-s3-data" {
    user_name = "prd-put-s3-data"
}

resource "aws_iam_policy_attachment" "s3-push-web-all" {
  name = "s3-push-web-all"
  users = [data.aws_iam_user.prd-put-s3-data.user_name]
  roles = [aws_iam_role.s3-push-web-all.name]
  policy_arn = aws_iam_policy.s3-push-web-all.arn
}

resource "aws_vpc" "this" {
    cidr_block = var.vpc_cidr
    enable_dns_hostnames = true
    tags = merge(
      {
        Name = format("%s-vpc", var.name)
      },
      var.tags
    )
}

resource "aws_subnet" "public" {
    count = length(var.public_subnets)
    vpc_id = aws_vpc.this.id
    availability_zone = var.public_subnets[count.index].zone
    cidr_block = var.public_subnets[count.index].cidr

    #AUTO-ASIGN Public IP
    map_public_ip_on_launch = true

    tags = merge(
      {
        Name = format(
          "%s-public-%s",
          var.name,
          element(split("", var.public_subnets[count.index].zone), length(var.public_subnets[count.index].zone) -1)
        )
      },
      var.tags,
    )
}
outputs.tf 파일을 만들어서 terraform 적용이 끝날 때 표시할 메시지 또는 데이터를 정의한다.
mzmz01:~/environment/prac $ cat outputs.tf
output "vpc_id" {
  value = aws_vpc.this.id
}

output "public_subnet_ids" {
  value = aws_subnet.public.*.id
}
Terraform 실행
이제 인프라 생성을 위한 terraform 구성이 모두 끝났다.
먼저 terraform plan을 실행하면 현재 아래와 같은 에러들이 발생한다.
mzmz01:~/environment/prac $ terraform plan
#account_id
╷
│ Error: Reference to undeclared resource
│
│   on main.tf line 12, in resource "aws_iam_policy_attachment" "s3-push-web-all":
│   12:   roles = [aws_iam_role.s3-push-web-all.name]
│
│ A managed resource "aws_iam_role" "s3-push-web-all" has not been declared in the root module.
╵
╷
│ Error: Reference to undeclared resource
│
│   on main.tf line 13, in resource "aws_iam_policy_attachment" "s3-push-web-all":
│   13:   policy_arn = aws_iam_policy.s3-push-web-all.arn
│
│ A managed resource "aws_iam_policy" "s3-push-web-all" has not been declared in the root module.
╵
╷
│ Error: Reference to undeclared input variable
│
│   on main.tf line 17, in resource "aws_vpc" "this":
│   17:     cidr_block = var.vpc_cidr
│
│ An input variable with the name "vpc_cidr" has not been declared. This variable can be declared with a variable "vpc_cidr" {} block.
╵
╷
│ Error: Reference to undeclared input variable
│
│   on main.tf line 21, in resource "aws_vpc" "this":
│   21:         Name = format("%s-vpc", var.name)
│
│ An input variable with the name "name" has not been declared. This variable can be declared with a variable "name" {} block.
에러를 살펴보면 4개 모두 undeclared와 관련된 에러라는 것을 알 수 있다.
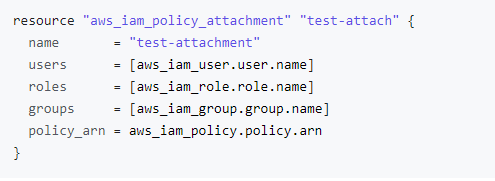
아래 내용을 살펴보면 aws_iam_policy_attachment 리소스를 사용할 때의 사용 예제가 있다.
https://registry.terraform.io/providers/hashicorp/aws/latest/docs/resources/iam_policy_attachment
registry.terraform.io
aws_iam_policy_attachment 리소스를 정의하기에 앞서 aws_iam_user, aws_iam_role 등의 리소스를 정의해줘야 한다.
우리가 작성한 main.tf 파일에는 aws_iam_user만 정의돼있으므로 하나씩 추가하면서 오류가 사라지는지 확인해보자.

먼저 가장 처음 발생하는 aws_iam_role과 관련된 오류이다.
aws_iam_policy_attachment에 roles 부분을 보면 aws_iam_role.s3-push-web-all.name이므로,
아래와 같이 새 리소스를 main.tf에 추가해준다.
resource "aws_iam_role" "s3-push-web-all" {
    name = "test-iam-role"
}
이후에 terraform plan을 실행하면 aws_iam_role과 관련된 undeclared resource 에러가 사라진 것을 확인할 수 있다.
대신 'assume_role_policy is required'가 표시되는데, 이는 aws_iam_role 리소스에 필요한 인자값으로
위 registry.terraform.io에 있는 'assume_role_policy = <<EOF ~~' 부분을 참고하면 된다.
mzmz01:~/environment/prac $ terraform plan
╷
│ Error: Missing required argument
│
│   on main.tf line 6, in resource "aws_iam_role" "s3-push-web-all":
│    6: resource "aws_iam_role" "s3-push-web-all" {
│
│ The argument "assume_role_policy" is required, but no definition was found.
╵
╷
│ Error: Reference to undeclared input variable
│
│   on main.tf line 18, in resource "aws_vpc" "this":
│   18:     cidr_block = var.vpc_cidr
│
│ An input variable with the name "vpc_cidr" has not been declared. This variable can be declared with a
│ variable "vpc_cidr" {} block.
╵
╷
│ Error: Reference to undeclared input variable
│
│   on main.tf line 22, in resource "aws_vpc" "this":
│   22:         Name = format("%s-vpc", var.name)
│
│ An input variable with the name "name" has not been declared. This variable can be declared with a
│ variable "name" {} block.
╵
'assume_role_policy'는 아래와 같이 코드를 수정해주었다.
resource "aws_iam_role" "s3-push-web-all" {
  name = "test-role"

  assume_role_policy = <<EOF
{
  "Version": "2012-10-17",
  "Statement": [
    {
      "Action": "sts:AssumeRole",
      "Principal": {
        "Service": "ec2.amazonaws.com"
      },
      "Effect": "Allow",
      "Sid": ""
    }
  ]
}
EOF
}
맨 마지막에 발생하는 vpc name과 관련된 에러는 이번 실습에선 vpc_cidr과 name은 아래와 같이 하드코딩하여 에러를 해결한다.
resource "aws_vpc" "this" {
    cidr_block = "10.0.0.0/16"
    enable_dns_hostnames = true
    tags = merge(
      {
        Name = "VPC_from_Terraform"
      },
      var.tags
    )
}
마지막으로 아래와 같은 에러가 발생했다.
아마 prd-put-s3-data란 user가 없어서 발생하는 오류인 듯 하다.
│ Error: error getting user: NoSuchEntity: The user with name prd-put-s3-data cannot be found.
│       status code: 404, request id: cc0d5bb2-dd88-4f4d-acba-7c65e8191144
│
│   with data.aws_iam_user.prd-put-s3-data,
│   on main.tf line 2, in data "aws_iam_user" "prd-put-s3-data":
│    2: data "aws_iam_user" "prd-put-s3-data" {
에러를 해결하기 위해 아래와 같이 prd-put-s3-data란 사용자를 만들었다.
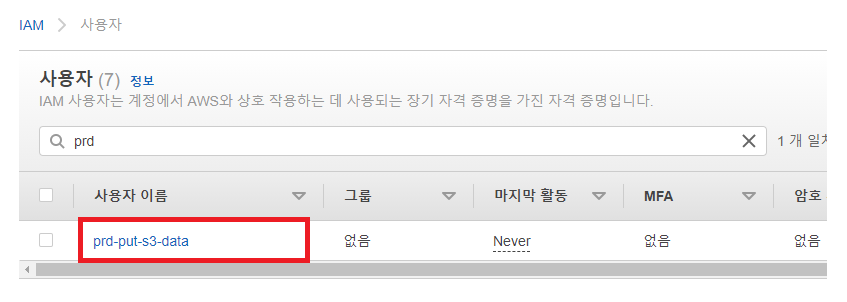
이제 terraform plan 실행 시 에러 없이 변경될 사항이 표시되는 것을 확인할 수 있다.
mzmz01:~/environment/prac $ terraform plan

Terraform used the selected providers to generate the following execution plan. Resource actions are indicated with the following
symbols:
  + create
  ...
  ...
  Changes to Outputs:
  + public_subnet_ids = [
      + (known after apply),
      + (known after apply),
    ]
  + vpc_id            = (known after apply)
terraform apply 명령어를 통해 실제 AWS 인프라에 적용해보자.
mzmz01:~/environment/prac $ terraform apply

Terraform used the selected providers to generate the following execution plan. Resource actions are indicated with the following
symbols:
  + create
  ...
  ...
aws_iam_policy.s3-push-web-all: Creating...
aws_iam_role.s3-push-web-all: Creating...
aws_vpc.this: Creating...
aws_iam_policy.s3-push-web-all: Creation complete after 0s [id=arn:aws:iam::[ARN]:policy/test-policy]
aws_iam_role.s3-push-web-all: Creation complete after 1s [id=test-role]
aws_iam_policy_attachment.s3-push-web-all: Creating...
aws_iam_policy_attachment.s3-push-web-all: Creation complete after 1s [id=s3-push-web-all]
aws_vpc.this: Still creating... [10s elapsed]
aws_vpc.this: Creation complete after 11s [id=vpc-044c7a849db85bd34]
...
Apply complete! Resources: 1 added, 0 changed, 0 destroyed.

Outputs:

public_subnet_ids = [
  "subnet-07ec6a72675d5fbfb",
]
vpc_id = "vpc-044c7a849db85bd34"
AWS 웹 콘솔에서 실제로 리소스가 생성됐는지 확인한다.


IAM 서비스에서 prd-put-s3-data 사용자에 test-policy 정책이 연결된 것을 확인한다.

위 실습 과정을 통해 Terraform을 사용하여 간단한 VPC를 구축해보았다.
아키텍처는 아래와 같다.
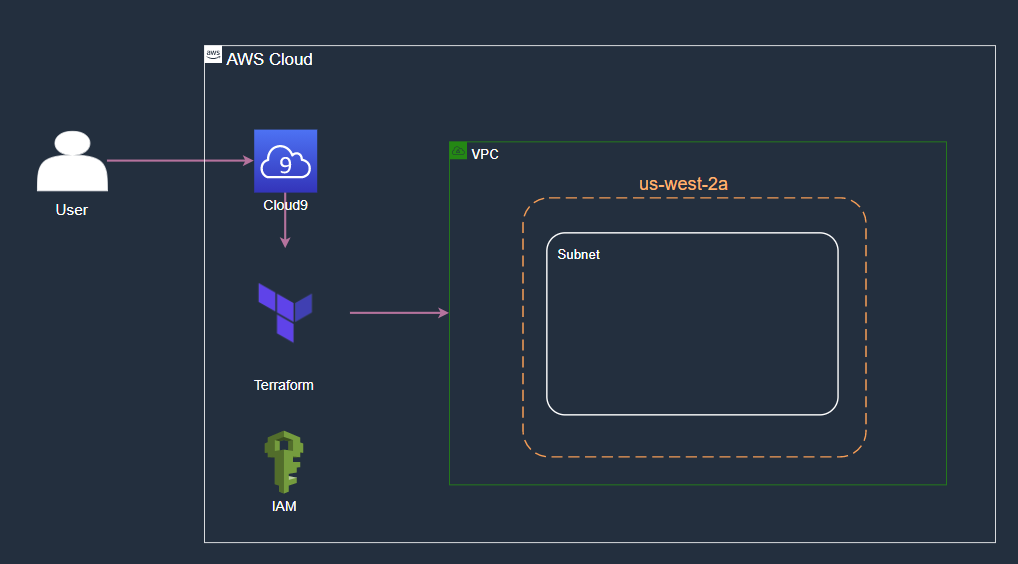
실습에선 한 AZ 안에 한 서브넷을 배치했지만 실제론 여러 가용영역에 여러 서브넷을 구성할 수 있다.
이제 생성된 리소스는 destroy 명령어를 통해 삭제하도록 한다.
mzmz01:~/environment/prac $ terraform destroy
aws_vpc.this: Refreshing state... [id=vpc-044c7a849db85bd34]
aws_iam_role.s3-push-web-all: Refreshing state... [id=test-role]
aws_iam_policy.s3-push-web-all: Refreshing state... [id=arn:aws:iam::[ARN]:policy/test-policy]
aws_subnet.public[0]: Refreshing state... [id=subnet-07ec6a72675d5fbfb]
aws_iam_policy_attachment.s3-push-web-all: Refreshing state... [id=s3-push-web-all]
...
...
Do you really want to destroy all resources?
  Terraform will destroy all your managed infrastructure, as shown above.
  There is no undo. Only 'yes' will be accepted to confirm.

  Enter a value: yes
...
Destroy complete! Resources: 5 destroyed.
이것으로 기본적인 Terraform 실습을 마치도록 한다.
다음 포스팅에서 Terraform, Ansible, CloudFormation에 대한 차이점을 다루도록 한다.
'IaC' 카테고리의 다른 글
| Terraform vs Ansible (0) | 2021.09.20 |
|---|---|
| Ansible 설치 및 실습 (0) | 2021.07.23 |